Sunday, December 21, 2008

Motive Power

This is a picture of my lawn tractor after the first wave of improvements. The unit is a Sears Craftsman model ST/16, and though I can't find any information I estimate it to be over 30 years of age. I purchased both this tractor and my lawn mower (another ST/16 in far worse condition, equipped with a 48" mower deck in lieu of the plow) for a total of $300 from one of my friends. And, both at the time and in retrospect, it was $300 very well spent!
The ST/16 is a 16-horsepower lawn tractor. According to my friends at the time this unit was made a 16-horsepower rider lawnmower was invariably built to commercial standards, and this is quite evident in it's construction. All of the working parts are made of steel, and all critical assemblies are easily accessable. The Tecumseh-built engine is air-cooled, is equipped with Timken roller bearings on the crankshaft and is capable of running flat-out for hours on end without problems! This tractor is in prime condition, however despite having more than a few problems the lawnmower does still get the job done, and extremely quickly; it seldom takes me more than an hour and a half to mow my 2-acre lawn!
When I purchased this tractor it came with the plow, snow chains and that large concrete block mounted to the 3-point hitch. The block is intended to provide more traction weight, however left it useless for pulling. I remedied this by fabricating a drawbar out of heavy barstock and attaching a "universal hitch" to the end of it. As you can see the hitch includes a ball, a tow hook and a pinhole hitch point, as well as a loop for attaching safety chains. The drawbar is attached to the tractor frame via a 3/8" grade 8 bolt, and I have tested it as being capable of withstanding a greater strain than the tractor's limited weight and power can produce!
On Friday, after nearly taking out a road sign when trying to enter Chestnut Street I thought it was a prime oppertunity to test out the plow. All I have to say is that I am VERY impressed! I was able to plow out Second Street, the portions of both Chestnut and Walnut Streets between Second St. and US 24, as well as the intersection of Walnut St. and Third St, and the unplowed portion of the intersection of Third St. and County Road 4A, in about two hours and with less than a gallon of gas! I did this work wearing my safety vest to help assure my visability. During my second round I donned my TLEW hard hat, since tree limbs were falling due to the severe icing earlier in the day.

More in Part 2...

Friday, December 19, 2008

Retroreflectors

No, I don't mean "Old School" reflectors. What I mean is reflectors that redirect most of the light hitting them back to the source.
To the left is a picture of the TLEW emblem reflector that I am borrowing, as well as the two that I have made so far. The "candy stripes" are for use on the door of my truck, the DOT-style one is for use on either the bed or the bumper (thought I may end up attaching a couple of them directly to my rear bumper. they are, after all, the only "useful" bumper sticker in existance!
As with my PPE post, these magnets are intended both for my personal safety, and to make my truck look more "official." I think they do a good job at both.

Cylinder Head

After weeks of waiting I finally got the tools and ambition to unload this massive hunk of cast iron from the bed of my truck. This is one of six cylinder heads off of an Alco 539 6-cylinder prime mover (the engine of a locomotive). At 450 lbs it is approximately the size and weight of the not-too-small V8 engine in my truck! In terms of physical bulk it is also similar.
This head, as well as the one that needs repaired on TLEW 5109, both have erosion on the large tongue visable on the underside of the head. Time, corrosion and pressure have taken their toll, and both need this tongue either rebuilt or patched in order to avoid further compression leaks.
This head is probaly a sample part; the one currently on cylinder 5 of 5109's prime mover may be in better condition. In either event I am going to use this head to get one or two quotes on repairing the tongue.

Tuesday, December 9, 2008

Hammer + Anvil + Coal +Tool Steel = Sharp Objects!

Finally it's time for me to post about one of my hobbies other than the TLEW. In case any of you didn't know I'm also an amateur blacksmith. My interests in this field are mainly related to making knives and chisels (hence the post's title), though I am planning on making tools and parts that aren't intended for cutting.
Thus far I have made a 1/4 inch mortise chisel for my father out of 1095 high-carbon steel (salvaged from a worn-out file, donated by my father!) and a hot-set (a blacksmith's tool used for severing heated steel bars) out of S7 tool steel. Unfortunately I don't have pictures of either of these tools at the moment, I will post them as soon as I have them. Future projects include two more chisels for my father (a 1/4" standard chisel and a 1" standard chisel), several kitchen knives (both for myself and for others) to be made from 1095 steel, which in my opinion takes a much better edge than 440C steel (which almost all good-quality commercial knives are made from), a field knife from S7 steel (which, though it won't take as good of an edge as common knife steels such as 1095, 440C, A2 or O1, is virtually impossible to break without trying!) and possibly a Hardy from either S7 or O1 (this is another blacksmith's tool used for severing steel bars).
Bladesmithing is not an entirely new hobby for me; in the past I have tried to forge knives out of various materials, including leaf springs, bolts, large nails and assorted scrap, usually with almost no luck. Now that I acually know something about the behavior of steels, and the fact that I am working with known alloys, I am having considerably better luck.
I am also experimenting with "selective hardening" with my high-carbon steel projects. By carefully heating specific portions of my workpiece I can create an extremly hard (and therefore very sharp) edge yet leave the "meat" of the tool soft and tough. This can be done either during the quenching phase (which is only practical for chisels), or by selectively tempering the tool after quenching.
That's all I have for now. I know I've used several technical terms and numbers in this post, I will at least give you the definitions of the steel numbers I used. as well as a few applicable terms.

Hardness: This term is pretty self-explanitory. In steels it is usually measured on the Rockwell-C scale, with most knives falling in the range of 58-62 HRC. As a rule, the harder the steel, the sharper the blade.

Toughness: The ability of a material to withstand stress. In general, the lower the hardness the tougher the metal. However other factors, such as the alloy composition, affect toughness more than the hardness.

Quenching: The act of rapidly cooling steel to achieve hardening. The quenchant is determined by the alloy; water-hardening steels are quenched in water or brine, oil-hardening steels in oil, and air-hardening steels are simply allowed to cool in still air. The act of quenching sets the crystalline structure of the metal to an extremely hard, yet brittle, state. In general, unless absolute maximum hardness is desired the steel is immediately tempered to improve it's toughness.

Tempering: The process of heating a steel object to a specific temperature to alter it's crystalline structure to greatly improve it's durability, at the cost of a slight measure of hardness. Depending on the alloy tempering can occur at temperatures from as low as 200 degrees F to 1300 degrees F. As a rule, the higher the temperature, the greater the degree of tempering.
When steel is heated in air it changes color (due to various oxidation conditions) and blacksmiths use these colors to judge the degree of tempering.

1095: Plain high-carbon steel. Also called 95-point carbon steel. High-carbon steel is usually water-quenched, and as-quenched is EXTREMELY hard (up to 66 HRC). Plain carbon steel has very low heat resistance, and is therefore easily tempered.

A-2: Air-hardening, medium-alloy steel.

O-1: Oil-hardening, medium alloy steel. Somewhat tougher than 1095 steel, yet after tempering at typical temperatures retains a similar degree of hardness.

S7: Air-hardening, high-alloy, shock-resistant steel. As the description suggests this steel is EXTREMELY tough, and though it cannot attain the hardness of the previous steels it can withstand stresses that would literally shatter other steels of similar hardness.

440c: High-carbon stainless steel. A common knife-making steel that I have no desire to experiment with. My reasons are three-fold. First of all, many stainless steels are precipitation-hardening (or age-hardening), which I have no idea of how to execute. Second, I have read that stainless steels can be very difficult to forge, and third I have a prejudice that a knife that doesn't rust can't be as good as one that does...

Saturday, November 29, 2008

PPE

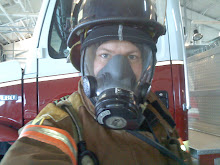
Me, dressed in appropriate Personal Protective Equipment (PPE) for track work at or near grade crossings. For those of you not familiar with PPE I will give an explination of the function of each piece of equipment and why it is important.

Starting at the top is the hard hat. In truth it is largely unnessasary for the type of work I am doing, however with the TLEW emblem it serves to make me appear more "official." In addition it does at least somewhat protect my head from falling debris while clearing brush, doing signal work or working above my head in general.
Next is the safety glasses. I have perscription safety glasses and wear them my entire waking day. Safety glasses protect my eyes from flying debris.
Just from looking at the picture the safety vest's function should be obvious: In normal, non-directional light the white reflectors appear gunmetal gray! I bought the vest for working near road-railroad grade crossings, mostly to be sure that I am visable to passing motorists. But again, I think it helps me to appear more "official."
My Carhartt coat in and of itself could also be considered PPE. In addition to keeping me warm it is also extremely abrasion resistant, and thus protects me from cuts and scrapes whilst I am working.

That's all I have for now. I have plans for another post, and pictures for it as well, which I plan on posting tommorow.

Friday, November 28, 2008

My Truck, Ready for Action!

My truck actually looks semi-important right now with the TLE&W emblem attached to the door! The emblem is a magnet, which I borrowed to use whilst working on the railroad, just to make me look more "official." I just finished painting the rust at the bottom of the door, which certainly helps make the whole thing look better.

Now if only the passenger side looked better...

Tuesday, November 25, 2008

Train Whistle


My first post is about one of several projects I am doing for TLEW: A real train whistle (Train Horn is more technically accurate). Yesterday I removed these horns from Coach 404 (the frontmost coach on the Blue Bird train). When I got them home I promptly hooked them up to my air compressor, opened the valve and... Nothing happened!
Despite not yet having eaten supper I proceeded to tear the diaphram assemblies (the actual noisemaking part of the horn) and found one filled with mud dauber nests, one full of spider nests and the third and fourth just plain filthy. I quickly cleaned them up and tested them again, and one horn then started working. By then I was cold and tired, and gave up for the day.
Today when I got home I went back to work. I cleaned all four diaphrams with solvent to remove the oils and dirt from them before testing them one at a time. Once all three chimed nicely I went to work on repairing the bells (trumpets). Notice the silver band on the longest bell? Yes that's tape! That bell was literally broken in half when I recieved it, the tape is just there for testing purposes. Later I will solder the two halves back together.
In this post is a test video of the horn... Yes it really is that loud! Since one of the trumpets is missing I converted the horn assembly to a three-chime by plugging the air inlet to the damaged diaphram. The result: It sounds like there's a train rolling through Texas! Of course the REALLY impressive part is the fact that I tested this horn on my grandma's air compressor at 100 PSI, which is pretty close to the train brake pressure of 90 PSI. The small air tank can't flow enough air to keep up with one chime (horn assembly), let alone three. However this is not the case on the train, where the air supply is both less restricted and virtually unlimited!
Obviously I'm not done. I still need to see about straightening up the one bell, I need to solder up the other, and I need to strip off all of the old paint and repaint the whole thing, before fabricating a mounting bracket. Once all that's done it'll be ready to be mounted to Coach 408 (the rearmost coach on the train, which acts as the head-of-train when the train is backing up).

Introduction

Alas, I have created a blog for reasons other than conveniance in logging my home improvements... However my phylisophical reasoning against blogging holds true: This is NOT a "what I did today" blog, at least not in the strictest sense. This is my "hobby log." This blog will deal with my major hobbies (Blacksmithing, my truck, my lawn tractors, aquariums and whatever) as well as my volunteer work with the Toledo, Lake Erie and Western Railway. I get the feeling that more posts than not will be about the TLEW, however I don't see this as being a bad thing...

Just a note: The nickname "Hot Rod" is the nickname that my boss, Mark Woodring, uses for me at work...