Thursday, March 26, 2009

Magnaflux Spotcheck

Magnaflux Spotcheck is a product that I learned about at work. It is a method of nondestructive testing of metallic objects for surface defects (such as cracks). Since I own overhead lifting equipment I felt the need to aquire the tools nessasary for OSHA-mandated safety checks (even though I am not governed by OSHA, since I don't have any employees). That and this test kit has many other uses...
In essence Spotcheck is a 5-step process involving three chemicals: A solvent-based cleaner, a penetrant and a developer. The solvent cleaner is just that, a solvent. Before purchasing the materials I did my research and discovered that the Magnaflux brand cleaner/remover is nothing but petroleum napthata, which is far more inexpensively available as Zippo lighter fuel, hence the yellow bottle of Ronsonol at the top of the kit.
At the heart of the kit is the Magnaflux Penetrant Dye (the right aerosol can). In essence it is nothing more than a mixture of a blood red dye and the most powerful penetrating oil that money can buy. This mixture is sprayed on the test part, allowed to soak and then wiped off with a rag soaked in solvent to remove any penetrant left on the sufrace.
After this the developer is applied. Basically the developer is merely talcum powder suspended in a powerful solvent (yes just talcum powder, or even finely ground clay, works, just not as well). When sprayed on the cleaned test part it draws the penetrant out of any defects, and the red dye stains the talc. This readily shows any defects in the test part.
I purchased the supplies to assemble this kit for less than half of the cost of the ready-made kit (which includes a can of penetrant, a can of developer, two cans of cleaner/remover, a penetrant marker, a shop rag and a case). The only part that I wish I had was the penetrant pen, other than that the rest of the kit wasn't worth the extra money...

Below is a demonstration of Spotcheck on a known surface discontinuity; where a flat-head bolt meets a plate. The results of this test were not as expected, I will explain below.


Penetrant (the blood-red stain) applied to the test part. I allowed about five minutes for the penetrant to work before the next step.


Surface penetrant removed with a rag soaked with Berryman's B-12 Chemtool. Notice the penetrant left in the "socket" of the allen-head screw working it's way up to the head of the bolt...


Developer applied and allowed to sit for five minutes. The developer applied to bare metal is titanium white; the pinkish color is due to the penetrant contained in the surface rust being pulled back up to the surface. Ideally the bolt should have been surrounded by a red ring, my guess is the lack of a ring is most likely due to both misapplication of the developer and the excessive amount of PB Blaster that I had soaked the bolt with prior to this test (and more likely than not didn't fully remove prior to the test). The entire head of the bolt is highlighted only by the penetrant seen seeping up from the socket as seen in the previous photo.


I want to redo this demonstration at a later date on another known discontinuity, at which point I will revisit this post...

Wednesday, March 11, 2009

Home Farming

I believe that the content of this post more accurately reflects "Hobbies and Interests" than "Home Improvements," so I will post it here instead of on my Home and Bar Improvement blog.
Within the last few years I have been steadily developing an interest in agriculture; both in the growing of crops and animal husbandry. To this end I have decided to make an attempt at at least some level of homesteading (the practice of growing and/or raising that that one needs to survive).
First and foremost I plan on planting a garden to grow those vegetables that I love the most: Tomatoes, carrots, sweet corn and asparagus. The last of these requires special care and growing conditions, which I have the means to provide... In addition to my planned vegetable garden I plan to plant at least two asparagus rows; one planted with a "local" variety of asparagus from my family homestead of Grelton, and the other with a commercial "High Production" variety.
As for my garden I plan on planting a variety of vegetables I enjoy, including but not limited to carrots, lettuce, string beans and sweet corn. I also have a desire to grow dent corn, but that desire more reflects my desire to make my own beer than that of growing my own food...
In addition to the usual garden vegetables I also would like to grow dent corn (as I already mentioned), grapes (which I would like to aquire from clones of family grape vines) and my own hops (which can be purchased from home-brewing suppliers, however it is too late this year to aquire the hop roots). I have the land and growing conditions to accomidate all of this, and though I am in preference of natural farming practice I am certainly not opposed to the use of commercially-available chemical fertilizers (from my decidedly limited experiance I like TSC-branded 12-12-12 fertilizer).
As far as pesticides go I tend to prefer the deterrance route (electric fencing), however I am an advocate of an old, effective and totally human-safe insecticide. It is made at home by boiling one full-size pouch of chewing tobacco in one quart of water. After boiling the tobacco is strained out and discarded, and the resulting "tea" is sprayed on the desired plants. Cigarette tobacco (which is considerably cheaper) can also be used, however suger will need to be added to make the mixture "sticky." Since the tobacco is prepared for human consumpion it is completely safe to eat, even without washing. However the nicotine contained therein is lethal to most insects. It is notable that this mixture is water-soluable, and will need to be reapplied after watering or rainfall.
As I said I am also interested in keeping livestock. I had originally planned to have more land than I do, and to live in the country. As such I had wanted to keep 5-10 head of cattle, and pasture then over a "rotated range" of 3-10 acres in three "zones." By moving the cattle between these zones it ia supposedly possible to raise saleable cattle without the use of commercial animal feed or feed corn. However with my property it is doubtful that I would be able to grass-feed more than one or two steers, and I don't have either the housing for those steers nor the money to build one.
As such I am considering raising chickens, which are considerably smaller (and thusly easier to feed). I belive that by fencing off a fifth of my property and fabricating a henhouse I could easily house at least a dozen hens.
I have read that by raising a kitten alongside the baby chicks is the best way to deter rodents (as the resulting adult cat will be accustomed to the chickens, and vice versa, yet the cat will remain agressive to any intruding vermin), and if I decide to erect a henhouse this is what I plan on doing, in additon to the double protection of both chicken wire and low-level electric fencing.
Thouch I would like to keep cattle I doubt that it would be possible given the limited amount of land that I own. However a gerden and mini-farm are dreams that I have not given up on...

The Village (of Texas) Blacksmith

It's been a long time since I've posted anything on this subject, so I think it's high time that I did so. Though I have not done nearly as much smithing this winter as I would've liked to I have gotten some accomplished. Here is what I have accomplished so far:
This is the "Hot Set" that I mentioned in a previous post. It is made of S7 tool steel; properly austentized and quenched, and tempered at 500 degrees. Though it looks rough and doesn't follow the traditional profile of a hot-set (which greatly resembles a hatchet) I believe in function over form, and this tool accomplishes it's intended function; that of severing heated metals. Of course it still needs a handle (as it is the recoil of the hammer blows is almost hard enough to break fingers!!!).


This is the beginnings of a large kitchen knife which, owing to my late delivery I may as well say was intended as a gift for my mother. This is a fragment of an old file (1095 tool steel) which I was in the process of seperating the blade and tang when I lost my ambition (both due to burnout and serous flaws in my forge). When I get around to finishing it I see the blade as being 6-8 inches long, and I plan on handling it with either stag (my preferred choice) or hickory wood.


A dual-purpose scraper I made for the TLEW railroad out of rebar (probaly the lowest-grade steel of them all, but adequate for the intended use). The flat end is sharpened at a 45 degree bevel, the flat end is square. Both ends are hardened (a relative term considering the extreme low hardenability of rebar), and the shank is left both unfinished and untreated.

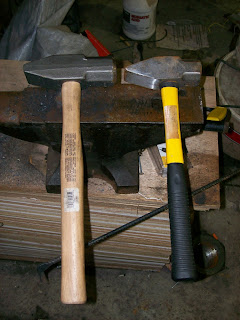
The tools I used to make these: My (considerably undersized) anvil and a pair of cross-peen hammers. The right hammer is a 3 lb. cheap Chinese "Harbor Freight" hammer (whose brother, by the way, I recently managed to break at work!). The right is a 4 lb. Mexican hammer (a considerable improvement over the other) which cost more than both of the previously mentioned hammers combined! I also have a small ball peen hammer (a gift from my father), and I plan on adding a 2 lb. cross peen hammer to this collection. I would LIKE to add a 4 lb. straight peen hammer (identical to the pictured hammers, except the "pointed" end is parallel to the handle), however I think it unlikely that I will find one...