Sunday, December 12, 2010

Big Mid-December Update!

After talking about it for over a year now I finally got a proper chicken coop!  With the help of my parents I got a Suncast shed, which with my brother’s help I erected yesterday and completed today.  Chicken Coop.

P1020305

Of course the chickens need a way of getting in and out of the coop, and here it is. 


Now the only problem is convincing the chickens that they should be INSIDE that building!  Hopefully the heat lamp I placed inside, as well as moving their feeder and water bucket in there helps…

Frozen Chicken...

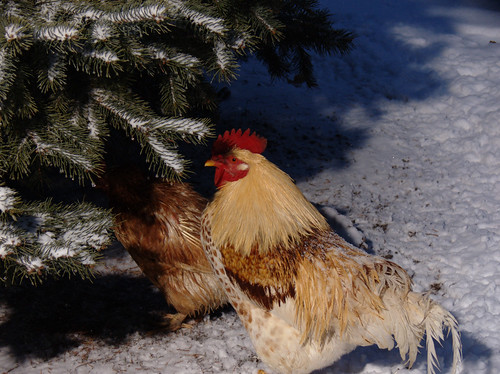
And now for some “Frozen Chicken…”  In other words at the time of this writing my chickens STILL haven’t realized that the new, heated building that houses their food and water supply is a good place to be…


 In Other News…

In the Can!

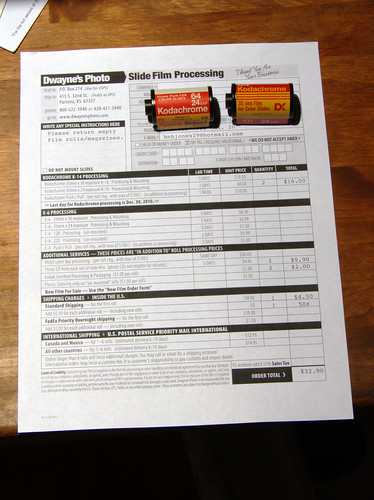
Also today I finsihed off my “bonus” roll of Kodachrome 64.  Hopefully I’ll be mailing off both rolls this Tuesday, as I sent a question to Dwane’s Photo to see if I could get my empty rolls back (I want them for use as display pieces). 

That’s all I have for now…  So until the next update…

Saturday, November 27, 2010

Sunflower harvest, speedlight guts and more…

I realize that I’ve been awhile in posting, and that most of my more recent posts have been strictly about photography.  The first is just plain laziness, and the second I have taken care of by adding a Flickr photostream to my sidebar. 

First:  the Fall of the Sunflowers

P1010964

It’s been over a month and a half now, but my sunflowers finally ripened and I cut the heads down.  Here is a photo taken just before the harvest.


P1010968

One of the astonishingly-large heads that we harvested!  Most weren’t quite this big, but…


P1010967

Just to give you an idea, this is about HALF of the harvest!  All in all it equated to about a half-bushel of seeds.  I’m rather impressed, especially since only about half of the plants actually made it to harvest!


Of course most of my corn is still in the field (I need to deal with this), most of what isn’t has already been fed to the chickens. 


And just one more quick thing…  Have any of you ever wondered what was inside a speedlight (standard camera flash)?  I had purchased a Sunpak Auto 411 Thyristor (a fairly powerful late 70s flash) off eBay.  When I got it the thing didn’t work.  So I tore it apart to see if I could find the problem.  So far no luck, but luckily for you I photographed the innards for all to see…

Gutted...

Click the picture to see a larger, annotated version on Flickr. 

Hopefully I can get this sucker working; it’s fairly small but when it does work it packs a surprising punch! 


Well that’s all I have for now.  Hopefully I won’t go so long without a post again…

Wednesday, November 3, 2010

Film Photography

P1020081

Yes, it’s a horrible pun but I couldn’t resist.  However this still-life is not what this post is about…

Yesterday I finally got back my test roll, and I am very pleased with the results.  My $2 Nikon performs like a champ!  Aside from the one picture that the lab screwed up, and the two that they (understandably) didn’t print the rest came out beautifully…

Sadly the same can’t be said for the photo CD that came with my enlargements.  The main problem is the resolution; the images I got are 1.6 megapixels (remember that a 35mm film camera is essentially a 10-20 megapixel camera, depending on what film you use) and the colors are screwed up (I knew I took a picture of a 24-bit palette for a reason!)  Oh well.  If I ever shoot any more film after my Kodachrome I’ll be sending it to a professional photo lab that provides “professional” photo CDs, not just the local “lab.”

Below is a somewhat hastily reconstructed picture of a sunset taken with my Nikon 5005 from the p**s poor scans on the Photo CD.  The film is Fujicolor ASA 200, camera is using programmed Auto-Exposure.  This picture looks “close” to both what I actually saw and what the actual enlargement looks like.  I will be scanning a selection of my enlargements and posting them on my online photo gallery soon.


IMG015

Monday, November 1, 2010

Photography: Kodachrome!

kc

You give us those nice bright
colors,
You give us the greens of
summers,
Makes you think all the
world's a sunny day,
Oh yeah!

Oops, sorry about that…  I just got so caught up in
the mystique of this legendary film and the old song
that I couldn’t resist!

In case any of you didn’t know, sadly Kodachrome is
a dead product and is no longer in production. When
I found out about that sad fact I decided that I had
to get a hold of and shoot a single roll of it, as
I will never have another chance in my life!

Well today it arrived, along with a selection of
color correction gels (one of which I used in the
taking of the above photo). I am rather anxious to
load and start shooting this film, as I have a
deadline (as of 12/31/10 it will be IMPOSSIBLE to
get Kodachrome film processed anywhere in the world!)
But first I want to wait for my test roll to be
developed just to make sure my $2 Nikon won’t destroy
this rare film!!!


(The above picture is taken from a test of a still-
life I am titling “The Past and Present of Film.”
The Olympus camera on the left is a stand-in for an
older 35mm. Obviously I will be taking the final
picture before I load and shoot my first and last
roll of Kodachrome!)

Tuesday, October 26, 2010

Yet more photography…

P1010983

Yesterday I finally finished exposing my “test roll” of film, and took it to the pharmacy today to get it developed (the film that is, NOT the camera!)  Provided this test proves that the Nikon is in good, solid working condition (despite likely having been dropped, as well as my own attempt to destroy the shutter…) I have one more thing I want to do with it before it goes into cold storage, but I will save that for another post…

Despite the extremely low purchase price ($2) I sincerely hope it’s a good camera, as even though it’s effectively 75 cents a frame to use it is also effectively a 20 megapixel camera!  With a massive list of accessory lenses available should I wish to aquire them.

Aside from having nearly completed my Nikon test I also did some timed exposure experiments with my Lumix.  My first experiment turned out beautifully (pic and link to full resolution picture is at the end of the post), however afterwards things didn’t go so well…

I decided to try capturing both the stars and a tree in one frame, using my strobe to illuminate the tree.  I removed my slave unit from the strobe so I wouldn’t lose it, but not it’s mounting…  Just as I was ready to take the picture the strobe suddenly started going off like the Fourth of July!!!  Turns out that my home-improvised slave mount finally failed, and after removing it the strobe functioned properly again in “open flash” mode.  Sadly the picture I had composed turned out horribly…  Still though, with all the random and very rapid flashing it must’ve looked like Beirut in my front yard!!!

P1010988

Here is a pic of my one “good” timed exposure (the astronomical ones sadly didn’t turn out…  The Earth rotates more in one minute than you’d think).  The reddish streaks are traffic (this frame was exposed over a period of 60 seconds).  The full resolution image may be viewed here.

Saturday, October 23, 2010

Photography: Art Photo #2 “The Glowing Tree”

Well I’ve had this photograph in mind for awhile: A tree set against the fading daylight lit from in front and beneath by an artificial light to make the tree appear to “glow.” And here’s the result:

P1010972

(Full resolution image may be viewed here)

This picture is of a Weeping Willow located across the road from me, using my new Lumix on Programmed AE mode with my Sunpak strobe set at full power aimed at the foliage at close range. Of course this picture required me to cross US 24 FOUR times (place my strobe, return, take pictures, retrieve strobe, return), but I think it was worth it…

P1010934

The Sunpak illuminating itself for this picture! I think it was set at about 1/24 power for this shot.

Saturday, October 16, 2010

Photography: New Digital Camera!

100_1279

After casually wanting one for the better part of five years I finally broke down and purchased a new digital camera off of eBay this week.  It arrived on Friday, and so far I am very impressed. 

Here is a picture of the Panasonic Lumix DMC-FZ30 next to my Sunpak Auto 522 Thyristor strobe.  It is an 8-megapixel “Bridge” camera (a camera that incorporates most of the features of an SLR but with a permanently attached lens and no complex mirror system).  It includes a lot of high-end features such as a physical zoom ring, a manual focus ring, full P-A-S-M exposure control, Optical Image Stabilization, a hot shoe (for mounting an external flash), a tilting display, an Electronic Viewfinder and a plethora of other features that I don’t care to mention here.  

100_1280

Here is a view of the back of both the Lumix and the Sunpak.  Though the screen is smaller than I would like it is very sharp (the EVF is also extremely sharp, albeit slightly laggy but from what I’ve read most are).  Yes I took these pictures with my old Kodak (and obviously without the help of the Sunpak strobe).  So how does it perform?  Well how about a picture of the Kodak using the Lumix!

P1010871

Here is a picture of both my Kodak Easyshare C633 6.1 megapixel pocket camera (which all of my pictures to-date have been taken with) next to a Nikon N5005 SLR that I picked up at Goodwill for $2!  This picture was taken using my new Lumix and the Sunpak strobe at about 1/15 power, aimed at the ceiling as a bounce flash.  I have yet to test the Nikon (since it uses film I want to be 100% sure it’s clean before I load it even for a test roll)

My old Kodak is not being retired, it is now my “grab and go” camera.  For anything even remotely more serious I now have a better option.  After all, my main reasons for wanting a new digital camera are the Kodak’s lack of features (I guess it’s called an Easyshare for a reason…) and it’s poor low-light performance (even with the Sunpak I have to use a flashlight as an autofocus-assist lamp!).  So far my new camera meets and/or exceeds all of my expectations.


Of course I decided to take a picture of both cameras next to each other, using my parents’ Lumix.  That’s all I have for now…

cameras1

Monday, October 11, 2010

Photography: Art Photo #1

After viewing my American flag against the sunset I knew I wanted to take a picture of it in that setting.  I finally did so today, not only for the pleasure of doing so but to gain experiance in multi-flash photography (albeit with my Kodak pocket camera, I just purchased a high-end Panasonic “bridge” camera, and plan on re-taking this picture with it as a test if nothing else).  And here is the result:

100_1266-2

This picture was taken kneeling before the flag, looking upwards at it with my Sunpak flash set about six feet to the side at 1/16 power at about a 45-degree angle to the right of the camera.  I am very impressed with the way I was able to both highlight the flag while at the same time giving it depth against the sunset-lit clouds. 

Saturday, October 2, 2010

Photography: MacGuyver to the Rescue!

100_1238 On Friday I finally received my Wein Peanut PND optical slave from Midwest Photo Exchange, and not completely to my surprise it did not fit in my strobe’s sync socket…  It turns out that SunPak strobes take an almost-standard 3/32 monoplug (which is several thousandths longer than a standard monoplug).  After purchasing a monoplug and finding out it didn’t work I tried manually tripping the flash by simply jamming a nail into the sync socket…  When the flash tripped I realized that the monoplug is simply too short.  My short-term solution:  Wrap most of the nail with label stock, and use two wires to connect the optical slave to the nail and the sync port’s sleeve.

It’s ugly, unstable and all-together sloppy, but it does work!  It reliably trips the strobe on my camera’s “main” flash, ignoring the preflash every time.  As I expected using an off-camera slave flash does improve the quality of my photos.  For demonstration purposes I decided to do some model photography.  Since I don’t have access to a proper model I decided to use my cat; Chessie.

100_1235

Here is a picture of Chessie using only my camera’s internal (and very weak) flash. 


100_1236

And a picture of Chessie using both the internal flash as a direct flash and the SunPak 522 Auto as a slave flash, bounced off the ceiling at 1/16 power.  This dual-flash picture is definately sharper, but I get the impression that my exposure compensation may be off…  After all I am only an amateur, and one inexperianced in multi-flash photograpry at that!  I will try to take more pictures tommorow, and both learn from my (inevitable) mistakes and post my best pictures then.  So until then…

Saturday, September 25, 2010

Photography: Professional flash gun!

Earlier this week on one of my frequent visits to the local Goodwill I found this little gem: A Sunpak 522 Auto Thyristor professional photostrobe. It only cost me $5, and I figured if nothing else it'd be something fun to play with. After doing some research I determined that this was in fact a professional strobe (which I had guessed simply by the number of controls when I first saw it), and a rather a powerful one for one that can run on standard batteries!
This strobe came with a camera shelf, which if I ever use it for it's intended purpose I will most likely NOT use; as with any digital camera I can afford I will have to use it as a slave flash I would want to mount it to it's own tripod.


An alternate view of the strobe, showing both it's back panel and it's 3-dimensional aiming.

Of course I decided to try to test this strobe with my "pocket" camera by simply trying to manually synchronize the strobe with the camera's built-in flash, and actually succeeded!


Here is a photo using the Sunpak 522 Auto at maximum power in a quote-unquote "Open Flash" shot (meaning that I managed to manually trigger the flash gun whilst the camera was actually sampling the image). The field plants are at least one hundred feet away from the camera (which has a 3/8 inch objective).For $5 I am rather impressed...

Sunday, September 12, 2010

Stereo (rack) Envy... Resolved.

After spending the morning after Church at my parents' house, while waiting for the local Goodwill to open (which, incidentally, is the place I purchased my receiver) I got to looking at my dad's stereo racks. Finally I got fed up with my lazy set-up (with the receiver, EQ and Phase Coupled Activator, simply stacked on one of my speakers)...
Today I purchased a cheap ($15) "bookshelf" to use as a new stereo rack, and finally arranged my stereo components, Media Center PC and one of my game consoles in a far more logical and elegant way.
Here is a picture of my new setup featuring (from top to bottom) my Media Center PC, my Optimus (RadioShack) Equalizer, a Phase Coupled Activator, my Pioneer 5.1 Ch Receiver, and my Xbox 360, between my television and one of my pair of Rectilinear speakers (with the cover purposefully removed to show the 6-way driver system) given to me by my father as a housewarming gift (and one I appreciate on a near daily basis). These were my father's college speakers; and as he and his roommate were the "stereo guys" in their dorm in college needless to say these are EXTREMELY good speakers! Given a clean input they sound as good at low volumes as they do at "permanant hearing damage" levels! Though the setup works exactly the same as it did before it is now much more accessable than it was, and definately looks better. I feel it was worth the time spent.

Sunday, August 22, 2010

Antique Radio

This last Thursday as part of my vacation I went up to Ann Arbor with my brother and one of our mutual friends. While wandering the town we stopped by a hole-in-the-wall antique store, where I found this gem...
This is a General Electric model 410 tabletop radio in very good condition (as you can see even the cloth speaker guard is intact!) After doing a little research I determined that this radio is about 59 years old. It was sold as working, and work it does with only one slight flaw, there is very little in the way of music on the MW (commonly called AM) band!!!
I had been looking for a low-cost, working or repairable vacuum tube radio for some time, and when I saw this unit marked "Works! $35" I decided to buy it. As I said the only problem is the overall lack of music on the MW band; though the dial is slightly off the reception quality and selectivity is better than some much newer transistor radios. The sound quality is good; with no undesirable distortion . Now all I need is a zero-range AM transmitter so I can supply my own music...

Home Ag: Sunflowers

In addition to field corn I also planted about 120 sunflowers, which I have neglected to post pictures of until now. Sadly they are well past the "pretty" phase, but that's not why I'm growing them...
These plants are all over 10 feet tall, with most having a head measuring over a foot across. Fortunately they are "droopy," which deters wild birds from stealing my crop.


And here's a picture with me holding a soda can next to one of the lowest heads... Yes they really are that big!
I believe that I lost maybe a fifth of these plants to rabbits that ran under the electric fence, however there are still PLENTY of flowers left over!

Saturday, June 26, 2010

Home Ag Update: Knee high by the Fourth of July... YEAH RIGHT!!!

As you can see from my two test plants, I am WAY past the old adage! Mind you my test plants (I call them that because I planted them to test the "Round-Up Readiness" of the rest of my seed) are a week ahead of my plot, but...


These plants are even taller than the test plants. The tallest of them are already over my head (I'm just shy of 6')! I've only applied nitrogen once since I planted them, and you can see the results.


And the other half of my garden; comprised of four tomatoes, and crop plantings of sweet corn and sunflowers. It isn't doing nearly as well as the field corn, as the weeds have taken over.


And a shot of my entire operation. Enjoy.

Sunday, May 23, 2010

Electric Fencing: DANGER 10,000 VOLTS


Well once again I got hit by my own electric fence, this time while "gapping" it to test the potential on the line (a rough estimate of how many volts are on the wire judged by the length of the spark it throws). I got hit while throwing the disconnect, and for the instant the line was hot it hurt worse than the time I touched one leg of a 480 at work (that's 277 volts AC)!
Here is a brief video of a half-inch spark drawn across the disconnect switch. Enjoy what it LOOKS like (hopefully you never get to find out what it FEELS like)!

Home Ag Update: The corn is up!

Finally about "one third to half" of my corn has sprouted! So far the first two planting days' worth of corn is up, with the rest about a week behind. And at least so far it looks like I have a very low mortality rate (as in by far and away most of the seeds have sprouted)!
Here is a picture of once of the further along seedlings, as well as a few of it's neighbors. However as you can see some weeds have sprung up, and though I had hoped not to need to I may wind up having to spray the corn patch with 2,4-D (I can't use Round-Up, as only about a third of the corn is guaranteed to be Round-Up Ready). This won't kill the grass, but it will take care of the broadleafs. We'll see, if the corn grows fast enough I won't have to spray at all...
That's all I have for now. More when the results are more dramatic.

Sunday, May 16, 2010

Home Ag: Field Planted!


Well two weeks after starting all of my corn (both field and sweet) are finally planted!
The three dark areas are the areas I planted today (I decided to "water-in" those areas).
So far I have planted a "mixed bag" of modern field corn and two varieties of sweet corn (Golden Cross Bantam hybrid, a classic sweet corn and Ruby Queen hybrid, a red-kernel sweet corn). As for the space left in the middle, I'm not sure what I'm going to do. I'll have to make a trip to a greenhouse before long...

Sunday, May 9, 2010

Home Ag: Fixin' the Cistern!

NOTICE: Second post today!

I feel very fortunate that my house came with a cistern; a now all-but forgotten source of fresh water. A cistern is a large underground storage space for water, which is generally supplied by rain collected by the house's roof.
My cistern is located on the north wall of my house, and has no clear design feature for filling it. I plan on using aboveground courrogated drain pipe to move rainwater from the eaves through the access hatch visable in the picture, and to use a sump pump to actually use this water to irrigate my crops.
In order to do this I need to run both a water pipe and an extension cord down the raised hole on the right side of the picture, and fish them out through the access hatch to attach them to a pump. Most likely this will be easier said than done, but in the end will be well worth it, as this is a source of FREE water for irrigating both my garden and my lawn!

As of right now the only function that my cistern serves is to provide a home for a single frog! Currently the cistern holds about two inches of water, and as you can see the wreckage of the old wellhead pump are still in there. Once I have a pump in there and connect the eaves to it, the frog will have to move out... Sorry, but I now officially need the stored rain water...

Home Ag: More Garden / Mini-Field pictures

Well this time it's more or less just pictures, since I've done some more work to the garden and want to show it off...


First picture: The garden (this year it's just a corn field) viewed from the road, with electric fencing installed and the first three rows planted. For this field I used "poly-wire" for the electric fence. Poly-wire is, in this case, comprised of three strands of PVC-encased fiberglass rope interwoven with three aluminum wires. The advantages of poly-wire, especially here, are enhanced visability to both people and animals (the "poly" in this wire is bright yellow and black) and ease of handling, which will be very important this fall when I will have to coil the "wire" back up before I cut the dead cornstalks down with my scythe.


Second picture: The (most likely) temporary hookup for the garden fence, with three pullets and the rooster making a cameo. The gate handle is made out of nonconductive rubber, and a strand of highly visable poly-wire connects the chicken fence to the garden fence. Eventually I will probaly replace this system with a buried cable with a disconnect switch, but for the moment, at least, this system should work just fine.

That's all I have for now. More after my corn starts to spring up...

Saturday, May 8, 2010

Home Ag: Tilling complete!


Before


After

Finally, the tilling is done... Needless to say I'm very tired right now, so this post will be short.
The tilling did NOT go easily. The sod was very thick, well developed and so on. It took everything I had to keep the tiller under control, even on the final (supposedly easy) pass.
Before the last two passes I added 20 pounds of 12-12-12 fertilizer to further improve the already good soil (corn is a very intensive crop after all). After those last two passes I was too tired to continue, though it could've used it.
Anyways that's all for now. Below is a picture of my Uncle Marv's tiller that I used, and my spreader. I'll post again once I have my seeds planted and they sprout.

Sunday, May 2, 2010

Is this... Corn?

I finally aquired my corn seed today, and all I have to say is it doesn't look the way I expected! Of course the corn seeds are much smaller than the harvest kernels, but the color is what threw me. I knew that the seed was likely to be coated (generally with fungucide and/or starter fertilizer) but I hadn't expected the color.
The reason the seed is multicolored is because the bag contains several different brands of corn. This is a very good thing, as diversity helps avoid problems. THis is the seed that was left over when the farmer cleaned out his planter this year; it is all high-end seed that should yield very nicely!
Now I just need to till under the jungle and actually put some of this into the ground...

Monday, April 19, 2010

Home Ag. prospects: Putting the Lawn into Production!

Let's be frank here; I don't like mowing the lawn. And I am cursed (many would say blessed) with a 2-acre lawn, a solid chunk of which grows at a near-rediculous rate. For much of the time that I have owned this property I have wanted to put this "jungle patch" into production, and grow a large garden. However my current job situation (extremely busy) all but prevents this (I don't have near the time or energy to maintain a garden with "traditional" practices, such as hand-pulling weeds and a mixture of companion planting and nicotine spray to manage insect pests). So I have come up with an alternative that also supports my poultry hobby; grow my own feed corn!
Pictured to the right is the result of my "homegrown" (quite literally in this case) soil quality test two years ago. Whilst out woodchuck hunting I "borrowed" a couple of modern hybrid dent corn seedlings (which are virtually dependant on fertilizer) and transplanted them on my lawn, just outside of the "jungle." I only used fertilizer of any sort (TSC-brand 12-12-12) once, WAY too late in the season. Yet the picture shows the results. The two surviving cornstalks, though decidedly stunted, each yielded an ear this size, very close to the size of the whole-ear corn sold commercially as squirrel feed! I'd say my soil quality test was a success!
I have currently staked off most of the "jungle," an area that measures 25x100 feet, and plan to till this area under within the next couple of weeks. By doing the math, and using the preferred planting rate for modern field corn of 36,000 seeds per acre, I figure this entire area would require about 1,200 seeds (which equals just under a pound of seed). The problem is that corn seed is sold in 80,000-seed bags costing between $70 and $400! I will need to talk to the farmers I know and see about buying a couple of pounds of seed...
I want to set aside the last few feet of this mini-field aside to grow a few tomatoes and a couple of rows of sweet corn, but that's all the gardening I have planned for this year. As I stated I simply don't have time to do more... The corn (both the sweet and field varieties) require minimal maintenance once established (especially since I'm not going for maximum yield, it's mostly for fun, and to put my land to use). Of course come fall I'll have 1,200 ears of corn to harvest (by hand!) and store, but I do have the space and (hopefully, by then) the time...

Sunday, February 28, 2010

The Chicken(s) and the Egg(s)

Finaly, time for an update on my hobby farm project...
My chickens are now fully grown, and they are none too small. The silver waterer pictured here holds five gallons, and you can see how big the birds are standing next to it.


Here is a better picture of my rooster. He is not a small bird; I'd say he's easily as big as a house cat.


And, finally, I'm getting eggs on a regular basis. Right now I'm getting about four a day, and as you can see from this picture they are quite large too.

Sunday, February 21, 2010

The Server Rack: Almost a real server rack!

Pictured here is a shelving unit that came "free" with my property, albeit in rather decrepit condition, in my workshop. I knew as soon as I saw it (even before I bid on my property!) what I wanted to do with it...
Well I finally did it!
After about a week of drilling, fitting, frustration and procrastination I finally repaired the shelf and moved four of my servers onto it.
The names of the computers are, from top to bottom and left to right: Dell-Orean, Volatile, The Hive and Quadrajet (the SCSI enclosure is there solely for storage).
And yes, Quadrajet (my genuine IBM server) is the massive monolith beneath the two mid-towers and SCSI enclosure! It really is that big!

Hopefully more updates about lower-tech stuff soon...